Quickstart running Antrea as CNI with kubernetes
Using Calico is the go-to CNI when quickly setting up a kubernetes cluster to play with. There are many flavours you can choose from when adding CNI to your cluster. My interest go's out to Antrea and because it's using Open vSwitch under the hood it offers more functionalities but then again the learning curve is somewhat steeper.
First let's get a simple kubernetes cluster up and running by using kubeadm. I followed the kubernetes documentation to install kubeadm and all required prerequisites. I'm using a fresh Ubuntu Server 20.04 and then basically execute the below commands starting with Docker:
sudo apt-get update && sudo apt-get install -y apt-transport-https curl
curl -fsSL https://download.docker.com/linux/ubuntu/gpg | sudo apt-key add -
sudo add-apt-repository \
"deb [arch=amd64] https://download.docker.com/linux/ubuntu \
$(lsb_release -cs) \
stable"
sudo apt-get update
sudo apt-get install docker-ce docker-ce-cli containerd.io
Now we'll have to disable the swap partition like so sudo swapoff -a, in short because kubernetes needs it like that. To make it permanent so that after a reboot it stays off execute sudo sed -i.bak '/swap/ s/^\(.*\)$/#\1/g' /etc/fstab. When that's done we'll continue with installing kubeadm and the last prerequisites that we need for now:
curl -s https://packages.cloud.google.com/apt/doc/apt-key.gpg | sudo apt-key add -
cat <<EOF | sudo tee /etc/apt/sources.list.d/kubernetes.list
deb https://apt.kubernetes.io/ kubernetes-xenial main
EOF
sudo apt-get update
sudo apt-get install -y kubelet kubeadm kubectl
sudo apt-mark hold kubelet kubeadm kubectl
I followed this documentation to setup the control plane with kubeadm (note that the CIDR must not be in use (in my case I do not want any overlap with my LAN range). Execute the following command to set it up:
sudo kubeadm init --pod-network-cidr=192.168.2.0/16
If this runs successfully you should see a bunch of information logged in the console. Part of it is how we have to configure the cluster in the users home folder to make the CLI tool kubectl work and execute command against the API, see below for the commands:
mkdir -p $HOME/.kube sudo
sudo cp -i /etc/kubernetes/admin.conf $HOME/.kube/config
sudo chown $(id -u):$(id -g) $HOME/.kube/config
Combined with this step I also copy the config to my laptop so that I can manage the cluster, without having to SSH into my master node, via the Visual Studio Code extension. Running kubectl config view should display the clusters config in yaml and it means we're ready for the next step, adding an implementation of CNI, namely Antrea. I did follow their documentation and you can use a specific version like so:
TAG=v0.12.0
kubectl apply -f https://github.com/vmware-tanzu/antrea/releases/download/$TAG/antrea.yml
Or by grabbing the latest directly from master:
kubectl apply -f https://raw.githubusercontent.com/vmware-tanzu/antrea/master/build/yamls/antrea.yml
Lastly we can repeat the steps up to kubeadm and then instead of running kubeadm init execute the kubeadm join command, that we copied after setting up the control plane. This will add the worker node to the cluster which will automatically schedule pods that cover the network implemented with Antrea.
You can now use the provided command line tool antctl via a Docker container or by downloading the binary. I did the latter and dropped it onto the master node by executing the following:
curl -Lo ./antctl "https://github.com/vmware-tanzu/antrea/releases/download/$TAG/antctl-$(uname)-x86_64"
chmod +x ./antctl
mv ./antctl /usr/bin/antctl
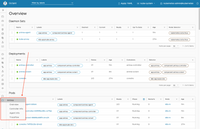
You can also get a plugin to visualize Antrea's objects in Octant. To do that follow these commands (which I got from here):
kubectl create secret generic octant-kubeconfig --from-file=admin.conf=$HOME/.kube/config -n kube-system
kubectl apply -f https://github.com/vmware-tanzu/antrea/releases/download/$TAG/antrea-octant.yml
kubectl describe service antrea-octant -n kube-system
Now this last command shows you a list of properties. Search for Nodeport and use that to. navigate to your-master:<nodeport> which in my case was: http://k8s-m.lab.codevieillard.tech:32413/
Now you should be able to see the Octant dashboard!