Kubernetes with Photon OS 4 BETA
Start with grabbing yourself a coffee. When that's settled you can get the latest Photon OS from here in the format that suits you best. I got myself the v4 beta ISO to boot it in a Virtual Machine. Do the following steps for two machines, this way we prepare the master- and worker node. After that we'll apply master node specific tasks and then the worker node specific tasks.
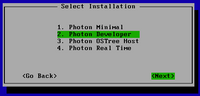
During install you get to choose the installation type. Selecting Developer here will include Docker and makes installing kubernetes a bit easier. Once logged in I keep DHCP enabled and just configure the DNS to point to my CoreDNS server. You could also configure the network completely statically by adding a file with a higher starting number to supersede the existing setting. For exampel: /etc/systemd/network/10-static.network and adding the configuration accordingly. In my case I'm using DHCP from my router so I only want to update the DNS and do that by setting it in /etc/systemd/resolved.conf after which I restart the following services:
systemctl restart systemd-networkd
systemctl restart systemd-resolved
In case you're rather new to Photon OS, after installation it's configure to login with root. And since Photon OS does an outstanding job at hardening and security, remote root SSH login is disable by default. To make it easy in a lab setup a quick fix is to allow remote root login by uncommenting and setting PermitRootLogin yes in the following configuration file /etc/ssh/sshd_config and then restart ssh by executing systemctl restart sshd.
I found the documentation on how to setup kubernetes very easy to follow. There is a slight difference compared to when using kubeadm because the components run as a service. You'll notice that in a bit. But now we need to install kubernetes and Photon OS uses Tiny Dandified Yum as package manager. So the command to execute is:
tdnf install kubernetes
If you selected the developer installation you should already have iptables otherwise; tdnf install iptables. Like I mentioned, because nothing is open by default we'll have to open the following ports to allow the connection between the master- and the worker node:
iptables -A INPUT -p tcp --dport 8080 -j ACCEPT
iptables -A INPUT -p tcp --dport 10250 -j ACCEPT
We should already have docker but make sure via systemctl status docker (otherwise tdnf install docker). If it's not running that's as expected, we'll do the starting and enabling later on, together with the other services.
Lastly update /etc/kubernetes/config to define the master: KUBE_MASTER="--master=http://<your-hostname>:8080" where <your-hostname> matches your scenario, either what you configured in your DNS. Or if you don't have a custom DNS running you could update the host file on both machines to make it work.
Now do the following on the master node:
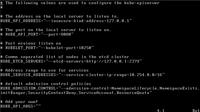
Make sure the file /etc/kubernetes/apiserver looks like this:
Now restart and enable the following services:
for SERVICES in etcd kube-apiserver kube-controller-manager kube-scheduler docker; do
systemctl restart $SERVICES
systemctl enable $SERVICES
systemctl status $SERVICES
done
Next is for the worker node:
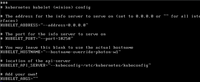
Update the configuration file /etc/kubernetes/kubelet to look like the following, where hostname matches the hostname you are using:
Now restart and enable the following services:
for SERVICES in kube-proxy kubelet docker; do
systemctl restart $SERVICES
systemctl enable $SERVICES
systemctl status $SERVICES
done
That it. Now going back to the master try kubectl get nodes and it should give you this:

Running kubectl get pods --all-namespaces show no resources. Looking back at what we just did, after making changes, restarting the kubernetes services via systemctl to pickup the changes in the configuration means the control plane components are not running in the same way as when using kubeadm. Which makes it a difference because now you can not make changes to these components via kubectl.